A light bar can add serious forward lighting, but the wrong mounting spot can create hood glare, block airflow, interfere with sensors, or leave the bar exposed to trail damage. The best light bar mounting locations depend on how you use your truck or SUV, the size of the bar, and the vehicle-specific brackets available for your year, make, and model.
Before choosing a location, decide what job the light bar needs to do. A wide flood beam works well close to the ground for slow trail driving and work areas. A spot or combo beam benefits from a higher, more forward position where it can project farther down the road or trail. Fitment comes first, but beam pattern, wiring access, and legal road use matter just as much.
Front Bumper Mounting: A Practical Everyday Choice
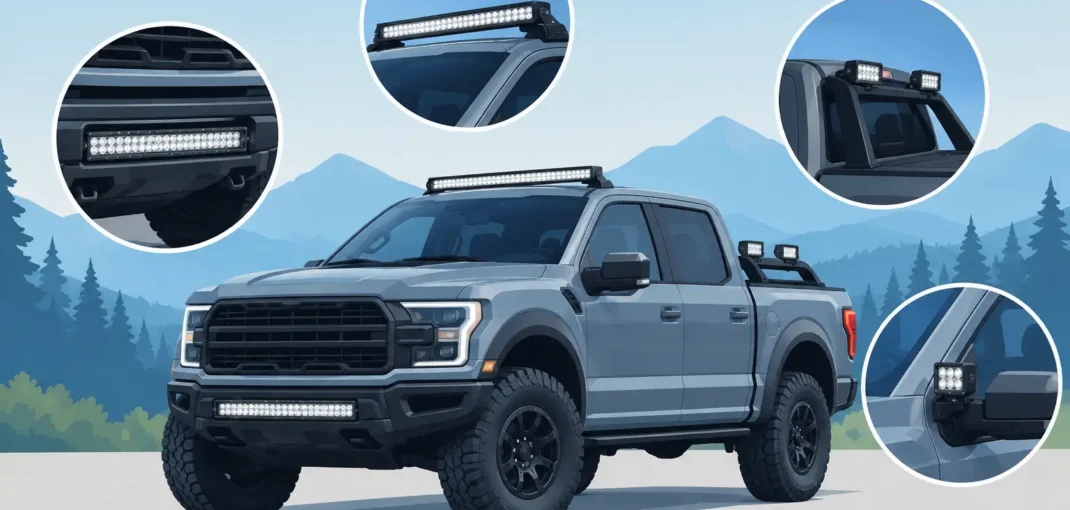
The front bumper is one of the most popular light bar mounting locations because it keeps the bar low, protected, and easy to wire. It is a strong option for pickups, SUVs, work trucks, and off-road builds that need extra light without adding hardware above the cab.
A lower bumper position works especially well with a flood, driving, or combo-beam light bar. The beam stays below the driver’s direct line of sight, which helps reduce reflected glare from the hood and windshield. It also keeps the vehicle’s overall height unchanged, an advantage for garage clearance, parking decks, and daily-driven trucks.
The trade-off is ground-level exposure. A bar mounted below the bumper or in a low opening can take hits from rocks, brush, snow, and steep approach angles. On a truck that sees rough trails, look for a recessed bumper mount or a protected upper-bumper position instead of hanging the bar beneath the front end.
Check clearance around tow hooks, recovery points, parking sensors, active grille shutters, and front-facing cameras. A light bar should not block airflow to the radiator or sit where it can interfere with a winch setup. Vehicle-specific brackets are usually the cleanest route because they place the bar around factory mounting points rather than requiring unnecessary drilling.
Behind the Grille for a Clean, Hidden Look
Behind-the-grille mounting is a favorite for owners who want added lighting without changing the truck’s exterior look. The light bar sits inside or behind the grille opening and is often visible only when it is turned on. This location is common on Silverado, Sierra, Ford truck, Tahoe, and Yukon builds where a factory-style appearance matters.
A slim single-row light bar is usually the best fit here. It can provide useful long-range or driving light while keeping the bumper face clean. The grille also offers a degree of protection from direct impacts and road debris.
Fitment is the deciding factor. Grille openings, active shutters, radiator supports, camera modules, and factory emblems vary by trim and model year. Do not assume a bracket designed for one truck fits another version of the same model. Verify the exact year, make, model, trim, and grille configuration before ordering parts.
Heat and airflow deserve attention, too. A correctly positioned slim bar generally has minimal effect, but a large bar placed too close to the radiator or shutters can restrict air movement. Route the harness away from fan blades, hot components, and moving shutter assemblies.
Roof Mounting for Maximum Distance and Coverage
A roof-mounted light bar gives the highest mounting point and the clearest path for light to travel. This is the classic choice for dedicated off-road trucks, overland rigs, and trail vehicles that need broad visibility over uneven terrain. A roof bar can illuminate farther ahead than a bumper-mounted bar because obstacles are less likely to block the beam.
The height also improves side-to-side coverage. That can be useful on narrow trails, ranch roads, job sites, and remote campsites. Larger curved light bars are often mounted above the windshield because the roof provides enough width for a long bar and stable bracket placement.
Roof mounting has real compromises. Wind noise can increase, especially with a tall bracket or a large straight bar. The bar and brackets may affect garage clearance, and exterior wiring must be protected from weather and abrasion. On some applications, hood glare can become distracting if the beam spills downward onto the hood surface.
Use brackets built for your cab and windshield frame whenever possible. Universal clamps may look convenient, but a loose or poorly positioned mount can vibrate, damage paint, or stress the roof edge. Keep the light bar tucked close to the roofline and aim it carefully after installation.
For on-road driving, roof-mounted auxiliary lights should remain covered or switched off where local laws require it. High-mounted bars can be extremely bright and are best reserved for off-road, work-site, or private-property use unless they are legal and properly aimed for your area.
Hood, Cowl, and Ditch Light Mounts
Hood-mounted and cowl-mounted lights, often called ditch lights, use compact pods or short light bars near the base of the windshield. They are not the first choice for maximum forward distance, but they are excellent for lighting the edges of a trail, spotting turns, and identifying obstacles beside the vehicle.
This setup is popular with off-road and overland owners because the lights can be aimed outward at an angle. Instead of blasting more light straight ahead, they fill in the dark areas that headlamps and a center-mounted light bar can miss. They are especially useful when navigating tight wooded trails or backing into a campsite.
The main downside is potential windshield or hood reflection. Low-quality mounts can also shake over rough terrain. Choose brackets that match the hood hinge or cowl mounting points for your vehicle, and confirm that the hood can open fully without contacting the lights or wiring.
Compact LED pods are usually a better match than a full-width bar in this location. Their smaller size keeps the installation clean and reduces the chance of obstructing the driver’s view.
Bed Rack and Rear Mounting Locations
Light bars are not limited to the front of the vehicle. A rear-facing bar mounted on a bed rack, headache rack, roof rack, or rear bumper can make loading, backing up, and setting up at a job site much easier. For pickup owners, this is a practical addition when factory reverse lights are not enough for dark driveways, trailers, or work areas.
A flood beam is usually the right choice at the rear because the goal is area lighting, not distance. Mount the bar high enough to spread light over the bed and behind the truck, but not so high that it shines directly into mirrors or creates glare for other drivers.
Rear auxiliary lighting should be wired with care. A separate switch gives you control when using the truck as a work vehicle or camping rig. If you want the lights to activate with reverse, make sure the wiring method is compatible with the vehicle and does not overload factory circuits. Many newer trucks use sensitive electrical systems, so a fused harness and relay are worth using.
Choose the Mount Around Your Vehicle and Use Case
There is no single best location for every truck. A daily-driven Silverado may benefit most from a discreet grille-mounted slim bar. A lifted Jeep or trail-focused Ford truck may get more value from a roof bar plus ditch lights. A work truck may need a protected bumper bar up front and a rear flood bar for loading equipment after dark.
Before you buy, measure the available space and inspect the mounting surface. Look for factory bolt locations, bumper openings, roof-rack crossbars, and clear wiring paths to the battery. Consider whether the bar will block a front camera, radar sensor, parking sensor, grille emblem, or tow hook. These details can make the difference between a clean upgrade and an installation you have to redo.
Select a light bar and bracket designed around your vehicle whenever available. Car and Truck Zone makes it easier to narrow the search by year, make, and model, helping you focus on lighting upgrades that suit the body style and available mounting space.
Aim the bar after dark on a safe, level surface, then recheck every fastener after the first few drives. The right mount should add useful light where you need it, stay secure through weather and vibration, and keep your truck ready for the next early start or late run home.