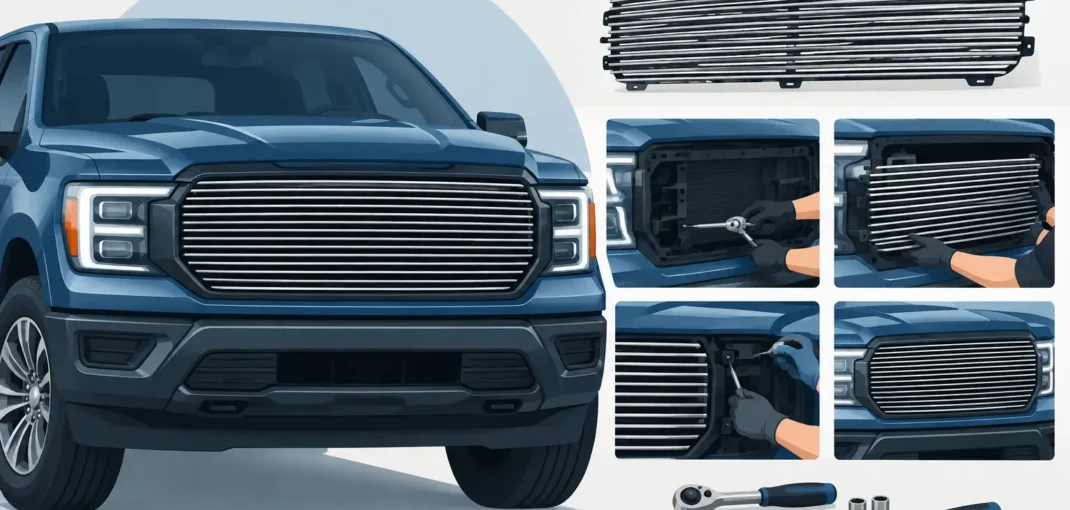
A billet grille can change the front-end look of a truck or SUV in an afternoon. Whether you want a polished aluminum accent, a blacked-out appearance, or a replacement for a damaged factory grille, learning how to install billet grille components starts with buying the right style for your exact year, make, and model.
The biggest difference between a clean install and a frustrating one is not the wrenching. It is knowing whether your new grille is an overlay insert or a full replacement, then giving yourself enough access to secure it correctly. Take your time with fitment, protect the paint, and do not force clips or mounting tabs that are not lining up.
Start With the Right Billet Grille Setup
Billet grilles generally come in two installation styles. An overlay billet grille mounts over or inside the factory grille opening. It is often the faster option because it may not require complete removal of the original grille shell. A replacement billet grille takes the place of the factory grille or grille insert and usually calls for more disassembly, but it can deliver a more integrated look.
Before opening the package, confirm the listed vehicle application. Truck front ends can change within the same generation based on trim level, tow hooks, camera packages, active shutters, emblem configuration, and factory grille design. A grille made for a Chevrolet Silverado with one front-end package may not fit another Silverado trim from the same year.
Lay out the grille, brackets, screws, clips, and any adhesive strips included with the kit. Read the supplied instructions first, even if you have installed exterior accessories before. Hardware placement varies by application, and a vehicle-specific bracket is usually there for a reason.
For most installations, you will want a ratchet and socket set, Phillips and flat-head screwdrivers, trim-panel tools, masking tape, a clean microfiber towel, and a flashlight. Some trucks also require Torx bits or a small wrench for bracket hardware. Keep a magnetic tray nearby so factory bolts and push pins do not disappear into the engine bay.
How to Install Billet Grille Inserts
An insert or overlay installation can be straightforward, but it still needs a solid mounting surface. Wash the grille area and dry it completely. Road film, wax, and dust can weaken adhesive-backed mounting strips and make it harder to see whether the insert is sitting squarely.
Open the hood and inspect the back side of the factory grille. On many pickups and SUVs, you can reach the grille openings from above after removing a plastic radiator cover or a few push-pin retainers. Use a trim tool instead of a screwdriver when possible. A screwdriver can slip and leave a mark in painted plastic.
Test-fit the billet grille before installing any hardware or peeling adhesive backing. Center it in the opening and check the gap along the top, bottom, and sides. If the grille has a logo opening, camera cutout, or sensor clearance, verify that each feature lines up now. A part that looks centered from six feet away can still sit crooked when viewed close up.
If the kit uses adhesive, peel only a small section of the backing from each strip and fold it outward. Position the grille, confirm its alignment, then pull the remaining backing while holding the piece in place. Press evenly along the mounting surface. Adhesive is best treated as supplemental retention unless the manufacturer specifically designs the kit to rely on it alone.
Install the supplied brackets and fasteners from behind the factory grille. Tighten them gradually, alternating from one side to the other so the billet bars remain centered. Snug is usually enough. Over-tightening can distort plastic grille slats, crack a mounting point, or pull an overlay out of shape.
Close the hood carefully and inspect the clearance. Make sure the grille does not contact the hood edge, latch area, or any moving shutter components. Then stand back and check it from the front and both corners of the vehicle before calling the job finished.
Installing a Full Replacement Billet Grille
A replacement-style billet grille typically requires removal of the factory grille assembly. Start by disconnecting the negative battery cable if you will unplug a front camera, parking sensors, grille lighting, or active grille shutter components. This is a simple step that can help prevent warning lights and accidental electrical shorts.
With the hood open, remove the upper radiator cover, retaining clips, and bolts that secure the grille. Some vehicles allow the grille to come out from the top. Others require loosening the bumper cover, removing headlight assemblies, or accessing fasteners through the wheel wells. This is where vehicle-specific instructions matter most.
Do not pull hard on the factory grille once the visible bolts are out. Hidden clips are common, especially near the headlights and lower corners. Apply light pressure while checking where it is still attached. If a clip is stuck, use a trim tool to release it rather than twisting the grille shell.
Once the factory grille is loose, disconnect every harness before setting it aside. Take a quick photo of connectors and wire routing if there are multiple plugs. This is especially helpful on late-model trucks equipped with front cameras, parking sensors, illuminated emblems, or shutter systems.
Transfer factory parts only if your billet grille kit is designed to reuse them. Move emblems, cameras, brackets, and sensors carefully, keeping their original orientation. Sensors that are mounted at the wrong angle may trigger false alerts or fail to work as intended. If a sensor bracket does not sit naturally in its new location, stop and check the application instead of modifying the part.
Set the new grille into position and start every factory fastener by hand. Do not fully tighten one side before the rest of the mounting points are engaged. Once all bolts and clips are in place, tighten them evenly. Reconnect all electrical plugs, reinstall the radiator cover and removed trim panels, then reconnect the battery if it was disconnected.
Before driving, switch on the ignition and verify that the camera, parking sensors, lighting, and any grille shutters operate normally. If you see a warning message, recheck the connectors before assuming there is a larger issue.
Avoid the Installation Mistakes That Show Up Later
A billet grille should stay secure through highway speeds, rain, heat, and normal truck use. The most common problems usually come from rushing the prep work or using the wrong mounting method.
First, never drill into the truck unless the grille instructions specifically call for it. Many modern applications use factory holes, clips, or vehicle-specific brackets. Unnecessary drilling can damage visible surfaces, create rust points on metal panels, and make a future grille change more difficult.
Second, avoid installing adhesive-backed pieces in cold weather or on a damp surface. Adhesive needs a clean, dry contact area and moderate temperatures to bond properly. If you are working in a cold garage, warm the mounting area gently and allow extra time before exposing the vehicle to a car wash or heavy rain.
Third, do not ignore hood and bumper clearance. A grille may look perfect with the hood open but shift slightly once all panels are reinstalled. Check panel gaps and latch operation before you put tools away.
Finally, preserve any factory components you remove. Store the original grille, hardware, and emblems in a dry place. Keeping them can be useful if you sell the vehicle, need a warranty-related repair, or decide to change the look later.
Choose Fitment Before Finish
Polished billet bars deliver a classic custom-truck look, while black powder-coated finishes work well with smoked lights, black wheels, and dark exterior trim. The right finish is personal, but fitment should always come first. Select your vehicle by year, make, model, and trim, then compare the grille style against your existing front-end layout before ordering.
Car and Truck Zone makes that process easier with vehicle-specific exterior upgrade options for popular trucks and SUVs. Once your new billet grille is installed, give the front end a final wipe with a microfiber towel, step back from the vehicle, and enjoy the kind of upgrade that is noticeable every time you walk up to it.